· clothink
How to Design Clothes When You Cannot Draw
- Fashion design
- Startup brands
How to Design Clothes When You Cannot Draw
You can know exactly what a jacket should feel like and still be unable to draw the sleeve.
Perhaps the idea is clear in fragments: the crop of one jacket, the collar of another, a leather with the right shine and a racing stripe you have not seen on a fashion piece. You can picture the customer wearing it. Put a pencil in your hand, however, and the proportions collapse.
That does not mean you cannot design clothes.
Drawing is one way to communicate a design. It is not the design itself. The design is the set of decisions behind the garment: its purpose, silhouette, proportions, materials, construction, colour and details. A beautiful illustration can hide weak decisions. A rough sketch supported by clear references and notes can describe a very good product.
Modern clothing design tools also make those decisions easier to visualise. You can begin with words, reference images, photographs of existing garments or a crude sketch, then develop a cleaner fashion sketch or technical flat. The important part is understanding what each stage proves—and what it does not.
This guide explains how to design clothes without traditional drawing skills, from the first idea to a concept clear enough to develop further.
In this guide
- Do fashion designers need to know how to draw?
- What you need instead of illustration skills
- Step 1: Define the job of the garment
- Step 2: Collect references by purpose
- Turn those labelled references into a sketch
- Step 3: Write a design brief
- Step 4: Make the silhouette visible
- Step 5: Develop the front, back and details
- Step 6: Test the design as a garment
- Step 7: Move from concept to specification
- Where AI helps—and where it does not
- A practical no-drawing workflow
Do fashion designers need to know how to draw?
No. You need to be able to communicate the product, but freehand illustration is only one way to do that.
Different people contribute to a garment in different ways. A creative director may define the concept and edit the range. A fashion designer may explore silhouette, styling and detail. A technical designer translates the idea into measurable information. A pattern cutter turns that information into shapes that can be cut and sewn. In a small brand, one person may cover several of these roles; in a larger business, they may be separate specialists.
Strong drawing skills are useful. They let you explore ideas quickly and can make communication more fluid. But they do not automatically give you knowledge of fit, fabric, pattern cutting or manufacturing. Equally, limited drawing ability does not prevent you from developing good judgement about product.
The more useful question is:
Can another person understand the decisions I have made without having to guess?
That might be achieved through:
- a written brief
- labelled reference images
- a collage or mood board
- photographs of a rough paper mock-up
- a traced or template-based flat
- an AI-generated sketch that you have reviewed
- a technical drawing produced by a freelancer
- an existing approved garment with measured changes
The method matters less than the clarity of the result.
What you need instead of illustration skills
If drawing is not your strength, replace it with a more deliberate decision-making process.
You need to be able to answer questions such as:
- Who is the garment for?
- What should it allow them to do?
- How should it fit and sit on the body?
- Where should the garment finish?
- Which areas should feel fitted, relaxed, structured or fluid?
- What fabric behaviour does the design depend on?
- Which details are essential to its identity?
- What appears on the back, side and inside—not only the front?
These are design questions, not drawing tests.
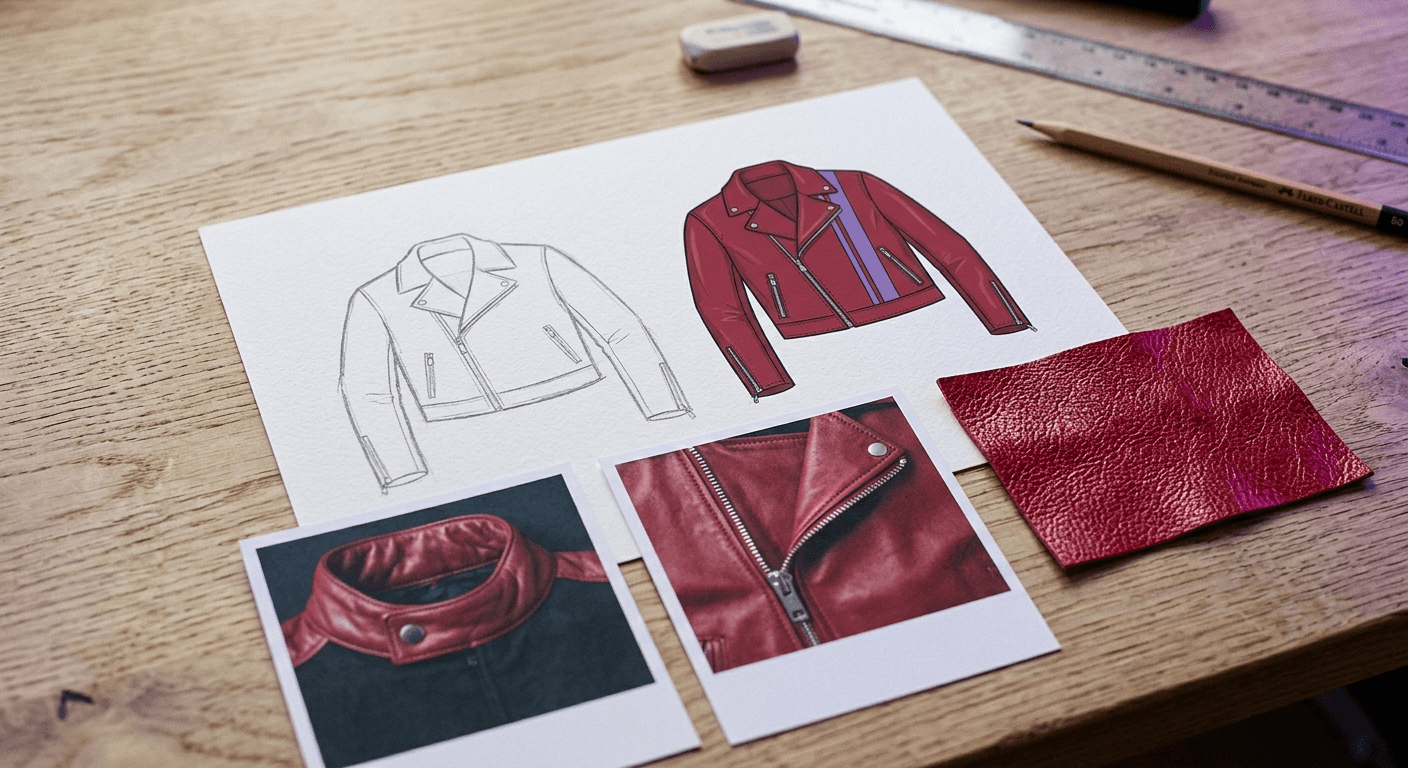
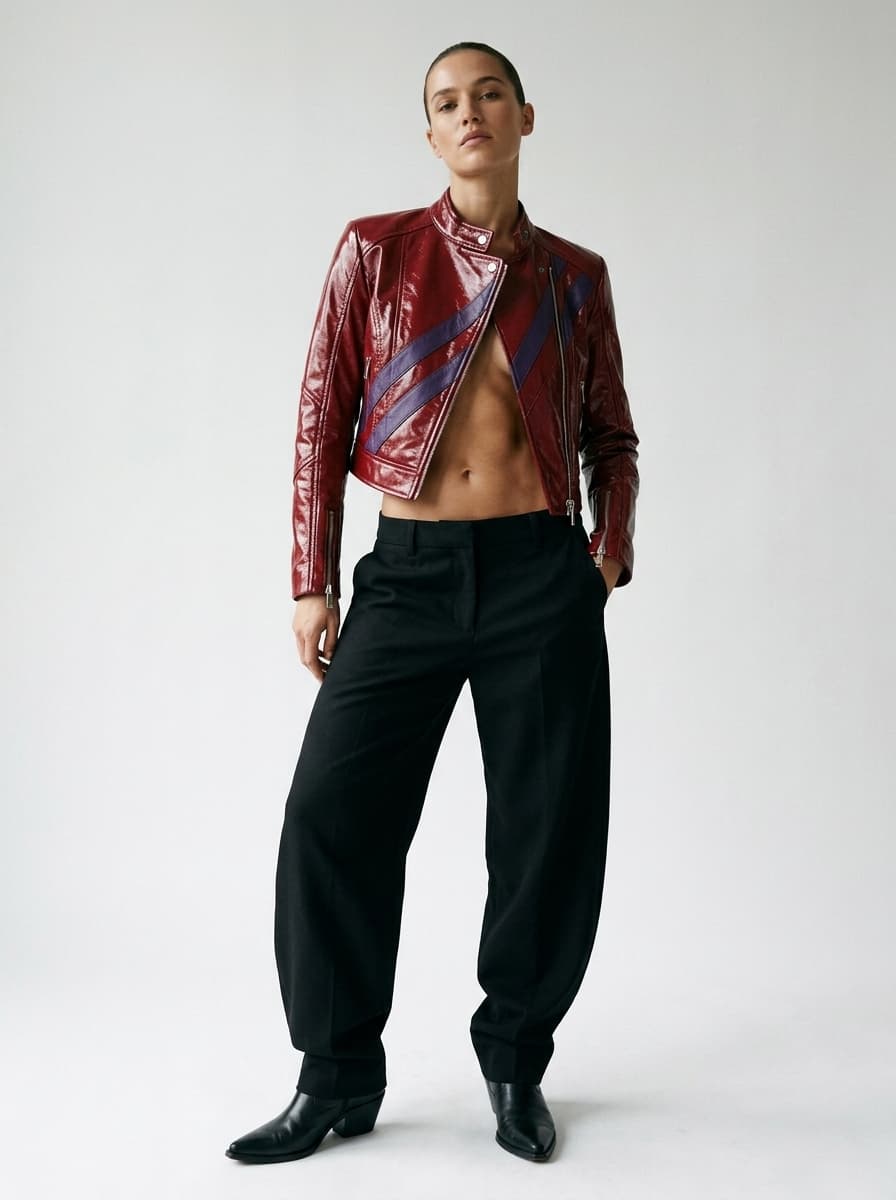
To make the process concrete, this article will use one example: a cropped cherry-red moto jacket with a violet racing stripe. The idea is fitted enough for evening, structured enough to hold a sharp shoulder, and distinctive without becoming costume racing kit.
At the beginning, that is only a direction. Our job is to turn it into a defined garment.
Step 1: Define the job of the garment
Start with use, not decoration.
Before choosing pocket shapes or zip colours, write down what the product needs to do. For the moto jacket, the requirements might be:
- worn as a going-out layer, not motorcycle kit
- cropped at the waist, fitted through the body
- holds its shoulder and hem in a high-shine leather
- carries a phone in clean zip pockets
- silver hardware, not heavy armour
- a violet racing stripe that is designed, not stuck on
This immediately affects the design. The jacket needs a cropped, structured silhouette rather than a long biker hem. The stripe has to sit on real panels, not float over them. A very soft leather may look expensive but fail to hold the crop; a stiff coated leather may hold the shape but restrict the arm.
Write one sentence that captures the product:
A cropped cherry-red moto jacket for night-out dressing, fitted through the body, with a violet racing stripe, silver hardware and enough structure to hold its shape.
That sentence is more valuable than “edgy racing biker”. It gives later decisions something to answer to.
Step 2: Collect references by purpose

References are useful when each one has a job. They become dangerous when an entire existing garment quietly becomes the design.
Instead of finding one jacket and asking somebody to reproduce it, collect separate references for separate decisions:
| What to compare | What you are studying |
|---|---|
| Classic leather moto | Cropped length and asymmetric zip |
| Racing leathers | Stripe placement and colour blocking |
| Tailored biker | Snap collar and structured shoulder |
| Fitted leather sleeve | Sleeve volume and zip cuff |
| Coated leather swatch | Shine, weight and how the fabric holds a crease |
Annotate each image. “Like this” is not enough. Write “hem finishes at the waist, not the hip”, “asymmetric zip only”, or “use the stripe angle, not the racing-suit armour”.
This does three things:
- It forces you to identify what is actually useful.
- It prevents unrelated details from being copied by default.
- It lets a designer, tool or manufacturer understand how the references should be interpreted.
References should also include what you do not want. If every moto in your research has heavy armour plating, a long hem and a brand badge, note that your design should avoid all three. Exclusion is a design decision.
Turn those labelled references into a sketch

You do not need to collage the photographs by hand. In clothink, attach up to three images, say what to take from each, and generate a new sketch.
For the moto jacket:
- In clothink, attach three photographs: a classic moto for the cropped body and zip, racing leathers for the stripe, and a tailored biker for the snap collar.
- Write the product sentence, then name the jobs by number.
- Generate a coloured sketch in clothink. Choose a technical flat if you need construction lines. Refine the result in clothink before moving to mockups.
A cropped cherry-red moto jacket for night-out dressing, fitted through the body, with a violet racing stripe, silver hardware and enough structure to hold its shape. Use reference 1 for the cropped length and asymmetric zip. Take the racing stripe from reference 2. Take the snap collar from reference 3. Structured shoulders, zip waist pockets, zip cuffs. High-shine leather. No logos, no armour plating, no long biker hem.
If you already own a close garment, photograph it and convert that one photo to a sketch in clothink. Attach several references when the idea is split across sources.
Step 3: Write a design brief

A useful clothing design brief sits between a mood board and a technical specification. It should be specific enough to guide a visual, but not pretend that every production detail has already been approved.
Build the brief in layers.
1. Product and customer
Define the garment type, target customer and use case.
Cropped moto jacket for evening wear, intended as a sharp going-out layer rather than motorcycle kit.
2. Fit and silhouette
Describe how the product relates to the body.
Fitted through the body; structured shoulder; cropped hem at the waist; sleeves slim rather than blouson.
3. Main construction
State the visible structure.
Snap stand collar, asymmetric centre-front zip, diagonal racing-stripe panel across the chest, two-piece sleeve and a clean cropped hem band.
4. Functional details
Explain what the garment needs to do.
Two vertical zip pockets at the waist; zip cuffs; the stripe must continue as a designed panel, not a print sitting on top of the leather.
5. Material direction
Describe behaviour as well as fibre.
High-shine leather or leather-look with enough body to hold the crop, shoulder and stripe; not a soft drape suede.
6. Colour and finish
Cherry red body; one violet racing stripe; silver metal zips and snaps; tonal topstitching; no contrast branding.
7. Non-negotiables
The stripe is part of the panel layout. The jacket should not read as motorcycle armour or as a long classic biker.
The non-negotiables are especially important when somebody else is creating the visual. They distinguish the core of the idea from details that can still move.
Step 4: Make the silhouette visible
Now create the first visual. You have several options even if you cannot draw.
Use a garment template
Start with a simple body or garment outline and adjust it using basic shapes. This is slower than sketching freely but useful when you want direct control. Vector software makes symmetrical lines, repeated pockets and colour changes easier, although it comes with a learning curve.
Trace your own reference photograph
Photograph a garment you own, then trace its broad outline as a starting proportion. Change the length, shoulder, sleeve and hem to match your brief. Treat the photograph as a measuring aid, not a design to reproduce.
Build a collage
Combine cut-out components to make a crude composite: one silhouette, another collar, a proposed pocket position and fabric swatches. It will not be production artwork, but it can make conflicts visible before you spend time on a cleaner drawing.
Generate a sketch from a written brief
If you followed the section above, you already have a first visual from labelled references. You can also start from the written brief alone: describe the moto jacket and generate a coloured, flat or fashion sketch. This is particularly helpful for escaping the blank page. The first image should be treated as a proposal, not a decision.
Whichever method you use, judge the first visual at thumbnail size. Ignore small features and ask:
- Is the body too long or short?
- Are the shoulders too narrow or exaggerated?
- Does the hem shape suit the product?
- Is the sleeve volume balanced with the body?
- Does it still look like the intended garment category?
If the silhouette is wrong, do not distract yourself by perfecting the snaps.
Step 5: Develop the front, back and details

A front view is not a complete garment.
The back determines the yoke, shoulder construction, vents and branding. The side reveals pocket projection, hem balance and how layers meet. The inside may contain facings, lining, internal storage and finishing that affect both cost and comfort.
For the moto jacket, the next design pass should answer:
- Does the racing stripe wrap onto the back, or stop at the side seam?
- How does the asymmetric zip meet the snap collar?
- Are the waist pockets vertical zips, welts or something the image invented?
- What happens at the cuff?
- Is the hem a clean cropped band, or has it grown into a classic biker length?
- Do the shoulder panels match front to back?
Create or request in clothink:
- front view
- back view from the approved front
- side view if the stripe or crop needs it
- close-up of the zip, collar and stripe
- a technical flat alongside the coloured sketch
Keep the views consistent. If the front sketch shows a cropped hem but the back view shows a long biker tail, the drawing has introduced a contradiction. AI-generated views can drift in exactly this way, so compare them rather than assuming they describe the same object.
Step 6: Test the design as a garment
At this point, the visual may look convincing. Now challenge whether it works.
Check movement
Can the wearer raise an arm, sit down and reach into the zip pocket? Does a cropped, fitted leather sleeve bind at the elbow? Will the structured shoulder still look sharp when the arm is lifted?
Check fabric logic
Would the chosen material hold the silhouette? A soft suede and a coated leather might share a similar red but create completely different jackets. If the design relies on a cropped hem and a sharp stripe, body and shine matter.
Check construction logic
Trace the seam lines. Do panels meet plausibly? Can the pocket opening be constructed where it is shown? Has the image invented a fastening that disappears at the edge?
Check hierarchy
Which detail is the focal point? If the garment has an unusual collar, multiple pocket systems, contrast panels, hardware and a curved hem, the ideas may be competing. Remove anything that does not strengthen the original brief.
Check the product against the brief
Return to the opening sentence. Is the jacket still a cropped evening moto with one designed stripe? Or has it become a full racing suit because those images were more dramatic?
This is where design judgement matters most. Generating another image is easy. Choosing what deserves to remain is the actual work.
Step 7: Move from concept to specification
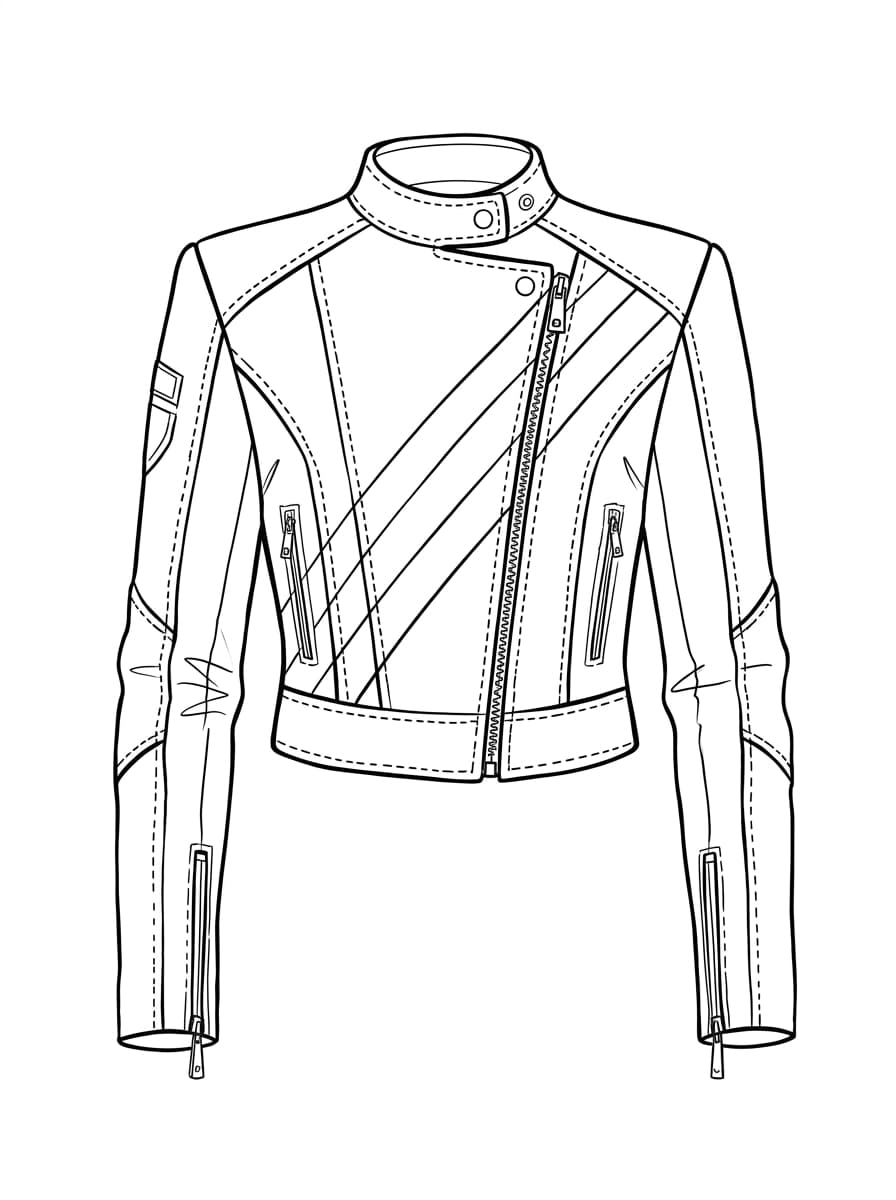
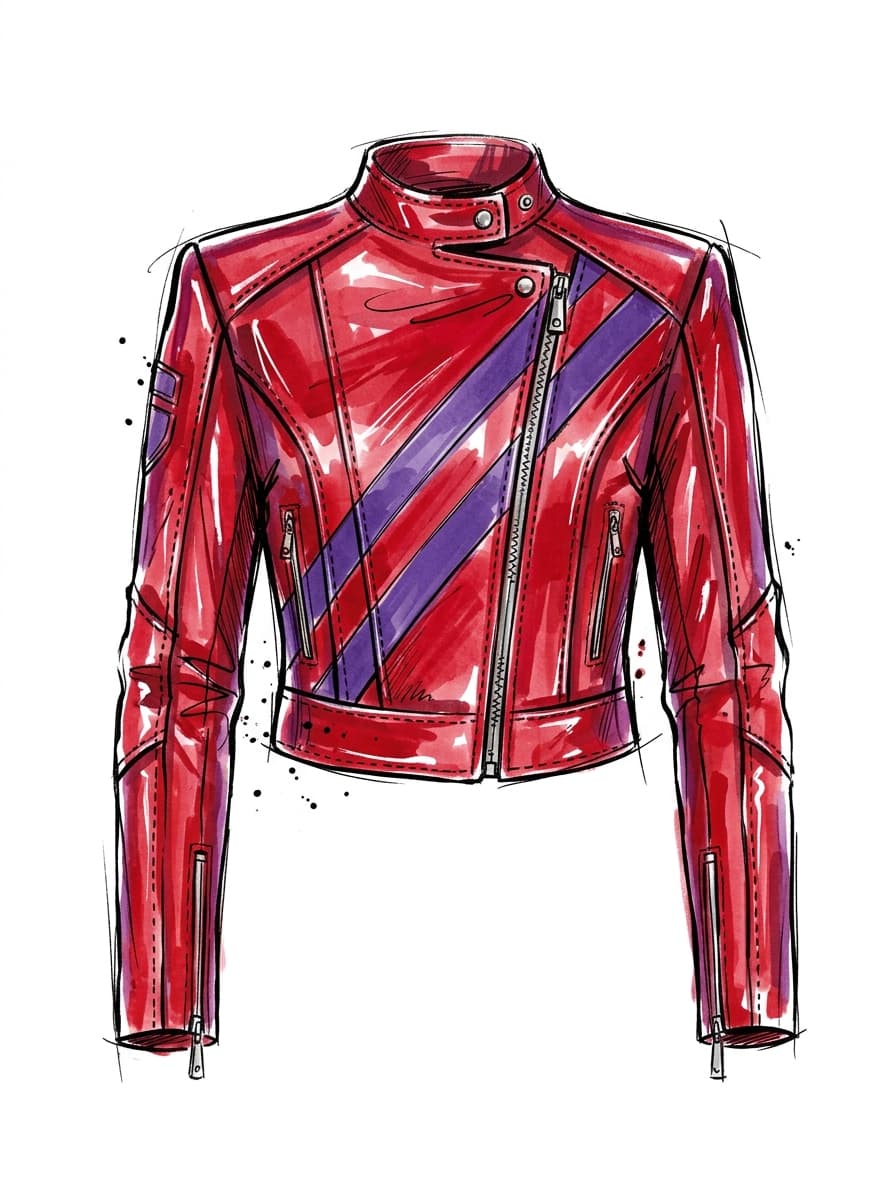
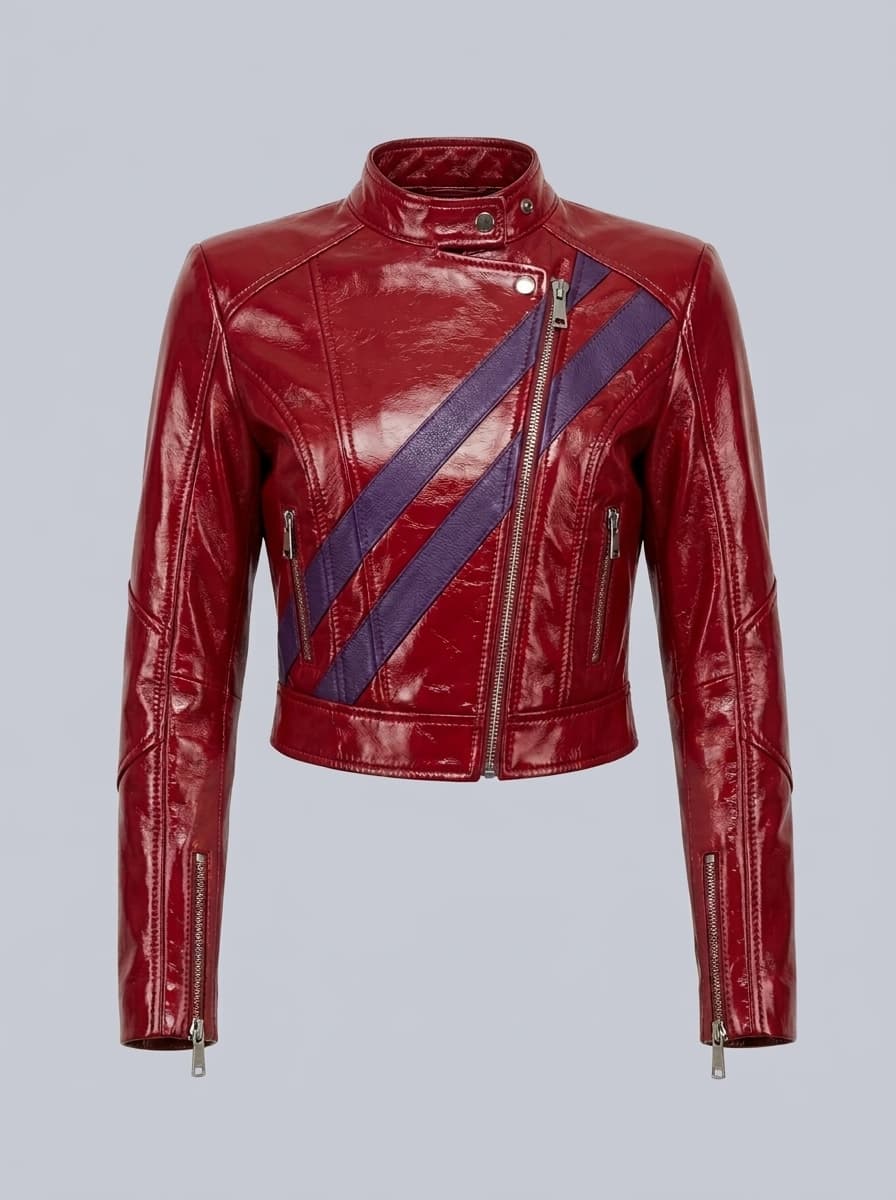
A finished concept makes the design understandable. It does not yet tell a factory everything required to make it.
Before sampling, the garment normally needs:
- technical flats showing relevant views and construction lines
- intended measurements and points of measure
- fabric specifications
- a bill of materials covering trims and components
- construction notes
- colour references
- artwork dimensions and placements where applicable
- label and packaging requirements
- a controlled version of the complete pack
The distinction matters. A photoreal image can help you judge whether the moto jacket feels right. It cannot confirm the exact chest measurement, leather weight, seam type or zip installation.
If you are new to this stage, read What Is an AI Tech Pack? and How to Build a Clothing Size Chart for Production. They explain what needs to sit behind the visual before a product is ready for reliable sampling.
About the visuals in this section. The side-by-side images above are real clothink outputs for the cherry moto jacket from this article: a coloured sketch, technical flat and photoreal mockups from the same brief. The reference boards, combine still and brief cards earlier in the article are editorial illustrations of the method — not exports from clothink.
Where AI helps—and where it does not
AI is especially useful for people who can direct and edit a design but struggle to render it by hand.
It can help you:
- brainstorm garment directions from a short brief
- translate written ideas into initial sketches
- generate flat, coloured and fashion views
- explore colourways and surface artwork
- create mockups before committing to a sample
- draft parts of a technical specification for review
It does not automatically know:
- whether the design is original enough for your market
- whether the fabric will behave as rendered
- whether a concealed construction is workable
- what measurements suit your customer
- whether the pattern fits a real body
- whether a factory can achieve the detail at your price and quantity
The best use of AI is not “make the design for me”. It is “help me make this decision visible so I can judge it”.
In clothink you can attach up to three photographs as style inspiration for a new sketch, name what to take from each, or convert a single photo of a garment you own. Extra views can be generated from the approved front. Selected designs then move into photoreal mockups and editable tech packs. You still review what the AI produces and decide what is ready to carry forward.
A practical no-drawing workflow
If you want a repeatable process, use this sequence:
- Write the product sentence. Define the garment, customer, use and main idea.
- Separate your references. Label which image informs fit, detail, material, colour or mood — and name those jobs when you generate a sketch.
- Write the brief. Cover silhouette, construction, function, material and non-negotiables.
- Create several rough directions. Do not polish the first answer.
- Choose the silhouette. Resolve proportion before surface detail.
- Develop the views. Add back, side, inside and close-ups where needed.
- Test the garment logic. Review movement, material, construction and hierarchy.
- Create a clean visual set. Keep the approved design consistent across views.
- Build the specification. Add measurements, materials, construction and colour information.
- Sample and correct. The physical garment—not the image—ultimately tests fit and make.
Common mistakes when designing clothes without drawing
Asking one reference image to do everything
This often produces a variation of the reference rather than a new design. Split the source material by purpose and state what should change.
Starting with logos and graphics
Artwork can make a generic garment look temporarily distinctive. Resolve the product beneath it: proportion, fit, fabric and construction.
Treating a realistic image as proof
Photorealism is persuasive. It can make impossible pockets and inconsistent seams look believable. Inspect the design, not only the finish of the image.
Changing the whole prompt after every result
If each generation restarts the garment, you cannot tell which decision improved it. Hold the approved elements steady and change one area at a time.
Sending concept imagery straight to a factory
The factory may be able to interpret it, but interpretation creates risk. Convert the design into controlled technical information before requesting an accurate sample or quotation.
You do not need to draw beautifully. You need to decide clearly.
Clothing design is not a competition to produce the most impressive page of sketches. It is the process of deciding what a product should be and communicating those decisions well enough for other people to develop it.
If you cannot draw, begin with the parts you can control: the customer, purpose, proportion, references, fabric behaviour and essential details. Use templates, collage, AI or a professional designer to make those choices visible. Then test the visual against the real requirements of the garment.
The first sketch does not need to be beautiful. It needs to give you something specific enough to question, improve and eventually make.
Frequently asked questions
Can I become a fashion designer if I cannot draw?
Yes. Drawing is a valuable communication skill, but design also depends on research, product judgement, colour, materials, fit, construction and the ability to edit ideas. You still need a reliable way to make your decisions visible, whether through digital tools, AI-generated sketches, templates, collage or collaboration with a designer.
How can I sketch clothes if I am bad at drawing?
Start with a garment template, trace the broad proportions of a garment you own, or use a written brief plus labelled reference images to generate an initial digital sketch. Name what to take from each photograph — for example the shoulder from one and the collar from another — so the sketch has jobs to follow. Focus first on silhouette and proportion.
Can I design clothes from several reference photos if I cannot draw?
Yes. Collect separate photographs for separate decisions, then attach up to three as style inspiration and state what each one should contribute. The aim is one new garment that follows those jobs, not a copy of any single source. If you already own a close garment, convert a photo of that piece instead.
What software can I use to design clothes without drawing?
The right tool depends on the stage. Mood-board tools organise references; AI fashion design software can generate sketches from text or images; vector software creates editable flats; 3D apparel tools simulate garments from patterns; and tech pack tools organise production information. See our [fashion design software guide](/blog/fashion-apparel-design-software-guide) for a stage-by-stage comparison.
Can I send an AI-generated clothing design to a manufacturer?
You can use it to communicate the visual direction, but an image alone is rarely enough for reliable sampling. The manufacturer will still need measurements, materials, construction details, colours, trims and other information normally organised in a tech pack.
Do I need Adobe Illustrator to design clothes?
Not necessarily. Illustrator is useful for precise, editable vector flats and artwork, but it is not the only way to begin or communicate a concept. The best choice depends on whether you need to create the vector artwork yourself, collaborate with people who use Adobe files or simply make your idea clear. Read [Do You Still Need Adobe Illustrator to Start a Clothing Brand?](/blog/do-you-need-adobe-illustrator-for-clothing-brand) for the full comparison. ---
Turn your clothing idea into a visual in clothink
Attach two or three reference images, name what to take from each, and generate a coloured, flat or fashion sketch. Then carry the approved design into photoreal mockups and technical development.